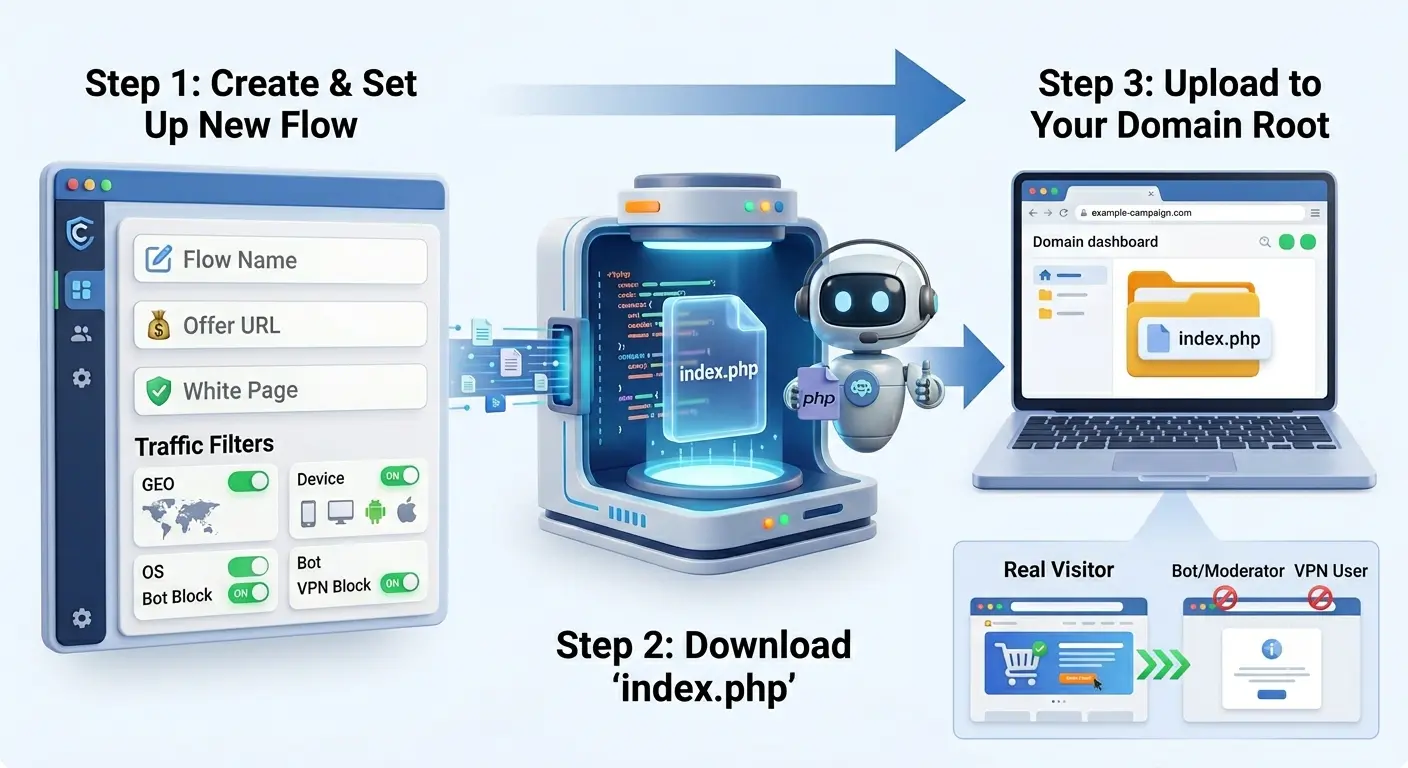
⚡ What Is a Flow?
A flow is the core unit of CyberCloakTDS. It defines one campaign end-to-end — who sees your real offer, who gets shown a safe page instead, and exactly how traffic is split, tracked, and reported. Every flow generates its own unique index.php file that you upload to your campaign domain. This guide walks through every single setting across all 4 steps of the flow wizard, explains exactly what each one does, and shows you the safest way to deploy it.
🔗 Step 1 — Links (White Page & Offer Page)
This step defines your two destinations: the White Page (shown to bots, moderators, VPNs, and anyone who fails your filters) and the Offer Page (shown to real visitors who pass every check). Both support multiple delivery methods — picking the right one matters a lot for safety and performance.
🚚 Delivery Types Explained
| Type | What Actually Happens | ✅ Pros | ⚠️ Cons |
|---|---|---|---|
| 🌐 Redirect | A real server-side 302 redirect. The visitor's browser fully navigates away — the URL bar changes to the destination. | Simplest, fastest, most compatible with every ad network. Works perfectly with Meta/Google Pixel tracking on the destination page (no third-party context issues). | URL bar changes — the real destination is visible to anyone who checks the address bar. |
| 📥 Loading | Your CyberCloakTDS server fetches the destination's HTML in the background and serves it directly under your own domain — no <iframe> involved. Works two ways: a local file already sitting on your campaign server, or a remote URL fetched and proxied live. |
URL bar never changes (stays on your domain). Doesn't get blocked by framing restrictions the way Iframe does. Required if you want Page Analytics (on-page tracking) to work. | Relative AJAX/API calls on a proxied remote page can break if the page is JS-heavy and calls absolute paths. Slightly slower (extra server hop). |
| 🖼️ Iframe | Embeds the destination URL inside an <iframe> tag that fills the screen. |
URL bar never changes. | Risky: many destination pages send X-Frame-Options/CSP headers that block being framed entirely — visitor sees a blank page. Third-party cookies/pixels inside the frame can misbehave. Generally the least reliable option. |
⚠️ Critical rule — never point White Page or Offer Page back at your own campaign URL. This has caused real support tickets: setting White Page (Loading) toindex.phpmakes the file include itself forever → server crash → visitor sees "connection refused." Setting White Page (Redirect) to your ownhttps://yourdomain.com/index.phpmakes it 302-redirect to itself forever → visitor sees "too many redirects." Both settings must always point to a genuinely different page or URL — never the flow's own entry file.
🧭 Recommended Combos
| Use Case | White Page | Offer Page |
|---|---|---|
| 🏃 Quick testing / simplest setup | Redirect → any real, unrelated safe site | Redirect → your affiliate URL |
| 🛡️ Maximum ad-review safety (Meta/Google), you control the offer page files | Loading → a real generated white page (blog/article) uploaded next to index.php |
Loading → your own-hosted offer page file (URL never changes, safest for review) |
| ⚖️ Balanced — nice safe page, but the offer is someone else's affiliate link | Loading → a real generated white page file | Redirect → affiliate URL (you don't control that page, so Redirect is safest) |
Rule of thumb: if you have file access to the offer page, Loading gives you the most protection. If the offer lives on someone else's domain (a network's affiliate link), Redirect is the safe, standard choice — Iframe should only be used when you specifically need URL-masking and have confirmed the destination allows framing.
🧪 Step 2 — Filtering
This step decides exactly who gets blocked. Every filter here is optional — an empty filter means "don't check this," not "block everyone."
🔌 Cloaking ON/OFF
When Cloaking is OFF, every single visitor — bots included — is sent straight to the Offer Page. This is a testing-only mode; never leave it off during a live campaign.
🌍 Network Filters
| Toggle | Logic |
|---|---|
| 🤖 Block known bot IPs | Blocks IPs from our auto-updated bot/crawler IP list and known bot user-agents (130+ patterns). Recommended: always ON. |
| 🕵️ Block VPN / Proxy | Blocks IPs belonging to known VPN, proxy, and datacenter/cloud ASNs (AWS, Google Cloud, Azure, etc). Recommended: always ON. |
| 📡 Block IPv6 | Blocks any visitor connecting over an IPv6 address. Off by default — only enable if your traffic source never sends legitimate IPv6 visitors. |
| 🏢 Block without ISP | Blocks visitors whose IP has no resolvable ISP/organization name in GeoIP — a common signal of a data-center or scanner IP with no real ISP behind it. |
| 🔗 Block without Referrer | Blocks any request that arrives with no HTTP Referrer header at all. Useful against direct scanners and some bots, but be careful — some real traffic sources (direct app opens, some in-app browsers) also send no referrer, so only enable this if you're sure your traffic source always sends one. |
🔢 Click Limits
| Field | Logic |
|---|---|
| Max clicks per IP / day | Caps how many times the same IP can reach the offer in one day. Once the cap is hit, that IP gets the White Page for the rest of the day. 0 = unlimited. Protects against click fraud / repeat scanning from the same IP. |
| Warm-up clicks | This is a click count, not a time window. The first N clean (passed-filter) clicks on the flow always get the White Page, no exceptions — only click #(N+1) onward can reach the offer. Use this right after launching a new ad so the very first review-bot visits during moderation never see the real offer. |
🎯 Target Criteria (allow only matching — leave empty to skip)
Every dropdown below works the same way: select one or more values to only allow those values through. Anyone not matching gets the White Page. Leave a dropdown completely empty and that check is skipped entirely (everyone passes it).
- 📱 Devices — Desktop / Mobile / Tablet
- 💻 Operating Systems — Windows, Android, iOS, etc.
- 🧭 Browsers — full modern taxonomy including in-app browsers (Facebook, Instagram, TikTok in-app, etc.)
- 🗺️ Countries — match your ad's GEO targeting exactly
- 🈯 Languages — matched against the visitor's browser language
- 🕐 Timezones — matched against the visitor's browser timezone
- 📶 Connection Type — WiFi/Broadband, Mobile Data, Corporate/Office, Satellite/Other — useful to catch corporate networks or datacenter-style connections that don't match your real audience
📋 Filtering by List
Attach one or more saved Filter Lists (managed under Filter Lists in the sidebar) to this flow. Each list has a type (IP / User-Agent / ASN) and a mode:
- ✅ Whitelist mode — a match on this list bypasses all other checks for that visitor.
- ⛔ Blacklist mode — a match on this list blocks that visitor, sending them to the White Page.
You can attach multiple lists of different types/modes to the same flow — they all get checked.
📊 Step 3 — TDS (Traffic Distribution & Tracking)
TDS is OFF by default (Basic Mode — a single plain Offer URL, no split-testing, no conversion tracking). Turn Enable TDS Features ON to unlock traffic splitting, postback conversion tracking, and pixel integrations.
🔀 Traffic Splitting
- Click ID Parameter — the GET parameter name your affiliate network expects for the click ID (e.g.
sub1,clickid,subid). Type it in and hit Apply to URLs to auto-append?sub1={click_id}to every offer URL below. Check your network's docs for the exact name. - + Add Offer — add multiple offer URLs, each with its own weight % (traffic is split proportionally — weights auto-balance to 100%) and optional GEO targeting per offer.
How GEO + weight combine: for each visitor, the system first looks for offers whose GEO list includes the visitor's country. If none match, it falls back to offers with no GEO set (your default/catch-all offers). If still nothing matches, it falls back to the full offer list as a last resort. Weight then decides which offer wins within whichever pool was selected.
💰 Conversion Tracking (Postback)
Copy the Postback URL shown and paste it into your affiliate network's S2S/postback settings field:
https://cybercloak.pro/api/postback.php?cid={click_id}&payout={payout}&key=YOUR_KEYYour network replaces {click_id} and {payout} with real values when a conversion happens. For status-based networks (Dr.Cash, AdCombo, CPA/lead networks), also add &status={status} — the same click can be pinged multiple times as its status changes (new → pending → approved/rejected/trash). Conversion is only counted, and Facebook CAPI only fires, once status = Approved.
Daily Budget (USD) — optional. Set your ad spend cap here to get a 90%+ usage warning on your dashboard.
📈 Page Analytics (on-page visitor behavior)
Tracks time on page, scroll depth, clicks, and real connection type on your own-hosted offer page — like a mini Google Analytics. Only works with Loading delivery type (local file or proxied offer) — it cannot work with Redirect or Iframe because the visitor's browser leaves/frames a page we don't control.
- Recommended embed snippet — no key needed, auto-detects
VV_CLICK_IDif your page sets it. The exact same tag works unchanged even if you reuse one offer page across multiple flows. - Fallback snippet (with a key) — only needed if this flow has no click_id (TDS off, or whitelist-bypass traffic).
You must save the flow first — the embed snippet/key is generated on save.
💬 Live Chat (visitor phone/chat on your offer page)
Adds a chat bubble to your own-hosted offer page where a visitor can leave a phone number and message — useful for lead-gen style offers (real estate, loans, etc). Turning it off only stops new conversations; anything already in progress keeps working. Admins can also Grant Access so specific dashboard users can view/reply to a flow's chats.
🎯 Conversion Platforms
| Platform | What You Configure | Fires When |
|---|---|---|
| 📘 Facebook CAPI | Pixel/Dataset ID, Access Token, optional Test Event Code | Automatically when postback status = Approved |
| 🔴 Google Ads / GA4 | GA4 Measurement ID + API Secret (server-side purchase event), optional Conversion ID + Label (client-side gtag click event) | GA4 fires on Approved postback; Conversion ID/Label fires when a visitor passes cloaking checks |
| 🟣 Ad Network Postback | Your traffic source's own S2S postback URL, using macros: {sub1}-{sub5}, {click_id}, {payout}, {status}, {gclid} |
Automatically when postback status = Approved |
Example Ad Network URLs: MGID — https://a.mgid.com/postback?cm={sub1}&payout={payout} | Taboola — ...s2s-action?click-id={sub1}&rev={payout} | Exoclick — ...conversion.php?click_id={sub1}&amount={payout} | Outbrain — ...unifiedPixel/conv?ob_click_id={sub1}&orderValue={payout}
✅ Step 4 — Status & Whitelist
- Status: Active — full cloaking logic runs as configured. Paused — every visitor gets the White Page, no exceptions, regardless of any other setting. Use Paused when stopping a campaign or during account review.
- IP Whitelist — one IP per line. A visitor whose IP is on this list bypasses every single check (bots, filters, GEO, everything) and always sees the real Offer Page directly.
⚠️ Testing tip: if you're using a VPN, proxy, or an online "link checker" tool to test your own link, your visible/browser IP is often not the IP that actually reaches our server — VPN exit IPs constantly change and rarely match what you whitelisted. To reliably test whitelist behavior, turn off any VPN/proxy, check your real current IP on a plain internet connection, and whitelist that exact IP.
📥 Downloading & Deploying index.php
- Save your flow after configuring all 4 steps.
- Click Download index.php on that flow's row in the Flows table. This single PHP file is your entire cloaking engine for that campaign — it has your flow's token, the CyberCloakTDS API endpoint, and every setting baked in at download time.
- Upload it to your campaign domain's web root — usually
public_html/orwww/in your hosting control panel (cPanel, aaPanel, Plesk, Hostinger hPanel, etc). - Naming it: the file works correctly under any filename — it doesn't have to be called
index.php. Rename it to whatever you like (e.g.site.php) as long as you then use that exact filename in the URL you actually run your ads to. What breaks things is using two different files for the same domain and mixing them up (e.g. running ads tosite.phpwhile a completely unrelated old file is what's uploaded there) — always confirm the exact file you uploaded is the same one your ad's URL points to. - PHP hosting is required. Static hosts like Netlify or GitHub Pages will not run this file at all — you need real PHP hosting (shared hosting with PHP, or a VPS).
- Test before going live — open your campaign URL in a fresh/incognito browser and check the Click Logs panel to confirm the verdict (Allowed/Blocked + reason) matches what you expect.
⚠️ Whenever you change any setting on a flow, you must re-download index.php and re-upload it to replace the old file on your server. Settings are baked into the file at download time — they do not sync automatically, and the old file will keep behaving exactly as it did before until you redeploy it.
📝 Final Checklist Before Going Live
- ☑️ White Page and Offer Page both point to real, separate destinations — never your own flow's own URL
- ☑️ Countries, Device, and OS filters match your ad's targeting settings
- ☑️ Block known bot IPs and Block VPN/Proxy are both ON
- ☑️ Warm-up clicks set if launching a brand-new ad (protects the first review-bot visits)
- ☑️ index.php downloaded after final save and uploaded to the correct file/URL on your campaign domain
- ☑️ If using Loading delivery, local white/offer page files are actually uploaded and accessible
- ☑️ Postback URL added in your affiliate network with the correct click ID macro
- ☑️ Whitelisted your real testing IP (checked with VPN off) if you want to preview the offer directly
- ☑️ Sent a test visit and confirmed the expected verdict in Click Logs